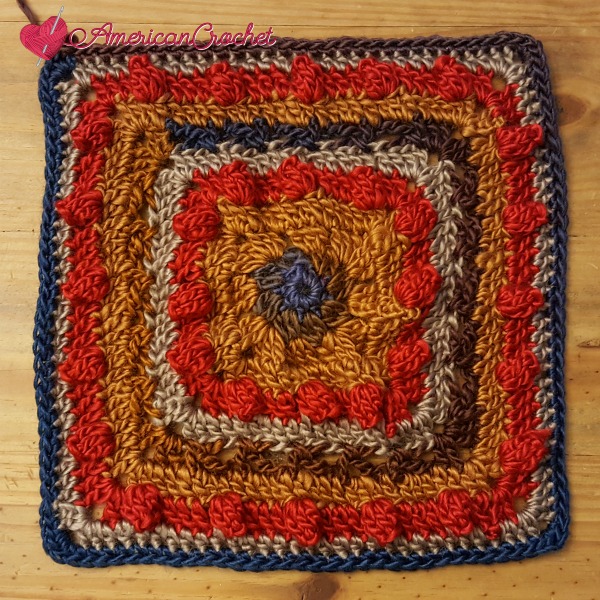
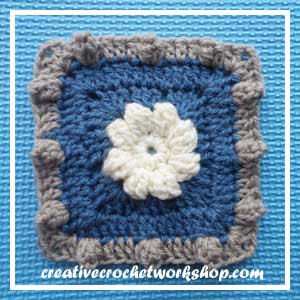
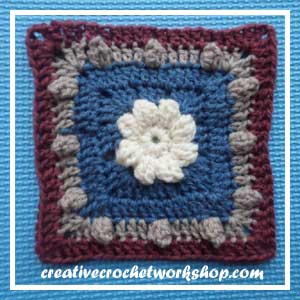
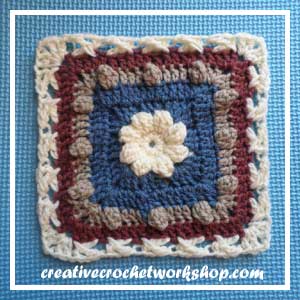
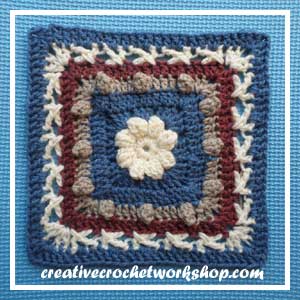
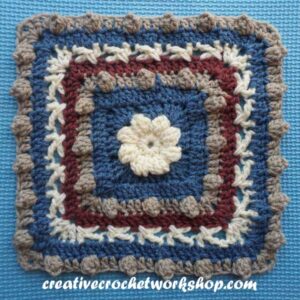
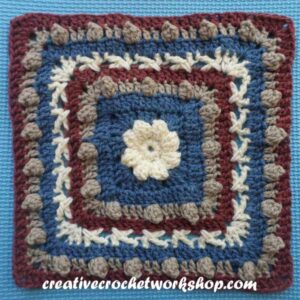
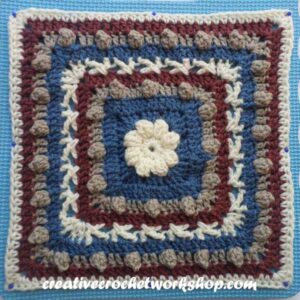
The Trail Square is my latest free crochet pattern. I love how well the colors worked up. When looking at this square I can’t help but think of Fall. Thank you Lion Brand for sending me this fun yarn to work with. Hope you enjoy it!
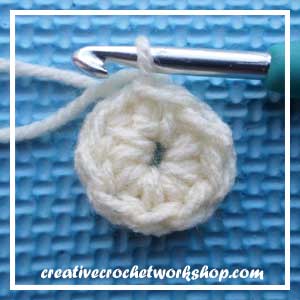
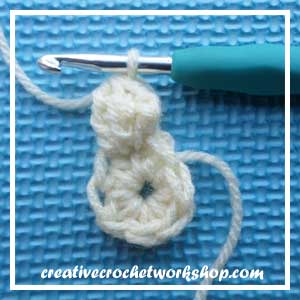
Tutorial photos courtesy of Joanita @CreativeCrochetWorkshop.com
- Click HERE to purchase the pdf for your convenience.
Level of Difficulty – Intermediate
Finished Size – Laying flat after blocking 12 inches square
Yarn – Lion Brand Heartland – Mountain Range (Color A) 3.5 ozs/100 g/147 yds/134 m, 100% Acrylic, Ochre (Color B), Ruby (Color C), and Taupe (Color D)
Hooks & Notions – I/9 (5.5mm), Scissors, and Yarn Needle
Abbreviations
Ch – Chain
CL – Cluster
Dc – Double Crochet
Lp – Loop(s)
Sc – Single Crochet
Tr – treble crochet
YO – Yarn Over
PC – Popcorn
Special Stitches
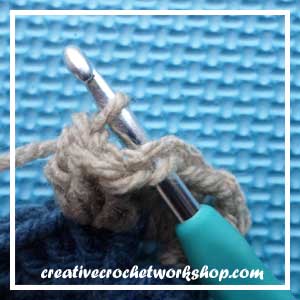
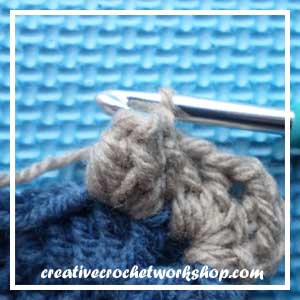
Cluster (CL): * YO twice, insert hook in next indicated st and draw up a lp to height of a tr; (YO and draw through 2 lps) 2 times; rep from * twice more, YO and draw through all 4 lps on hook: CL made.
Corner: (3 dc, ch-2, 3 dc)
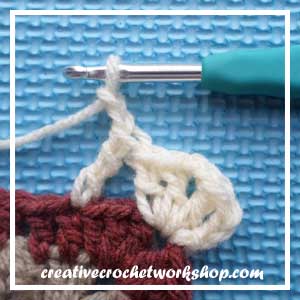
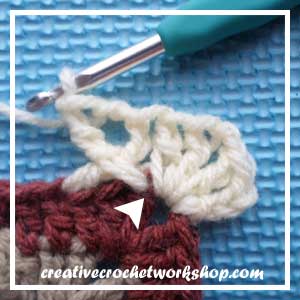
Popcorn: work 5 dc in indicated stitch, remove hook, insert hook into first st; pick up the loop from 5th dc, pull through the 1st st. Popcorn completed
Notes
CH 1 at the start of round does not count as a ST
CH 3 at the start of round counts as 1 DC

COLORS: A – Mountain Range, B – Ochre, C – Ruby, D – Taupe
Instructions
With color A
Ch-4 join with slip stitch to form ring
ROUND 1: CH 1, work 8 hdc into ring;
join with a slip stitch into the first hdc made (8 HDC)
ROUND 2: CH 1, work CL into same stitch as join; ch 1,
* work CL into next stitch, ch 1, repeat from * until end of round;
join with a slip stitch into top of first CL made (8 clusters, 8 ch-1 spaces)
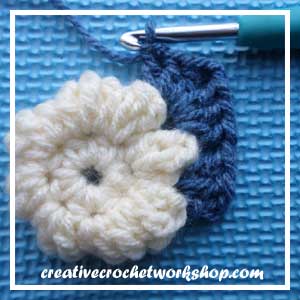
Fasten off color A attach color B in any chain 1 space

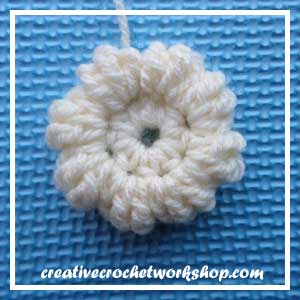
ROUND 3: CH 3, work 2 dc into same space, ch 1,
* work [3 DC; 2CH; 3 DC] into next ch 1 space (corner made),
ch 1, work 3 dc into next ch 1 space, ch 1,
repeat from * 2 more times;
work [3 DC; 2 CH; 3 DC] into next ch 1 space, ch 1;
join with a slip stitch into top of ch 3. (9 DC on each side = 36 DC; 4 x CH 2 spaces; 8 x CH 1 spaces)


ROUND 4: CH 3, * work 1 dc into each stitch and ch 1 space of previous round until corner ch 2 space,
work [2 DC, 2 CH; 2 DC] into ch 2 space,
repeat from * all around, working 1 dc into remaining stitches
and ch 1 space; join with a sl st into top of ch 3. (15 DC on each side = 60 DC; 4 x CH 2 spaces)
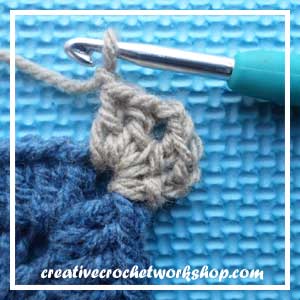
Fasten off color B attach color C in any chain 2 space

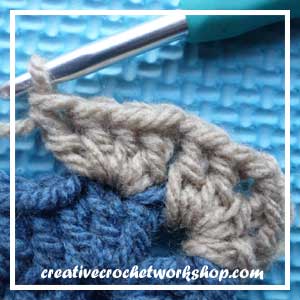
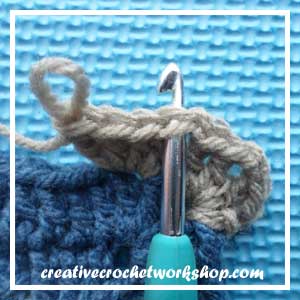
ROUND 5: CH 3, work [1 dc; ch 2; 2 dc] into same ch 2 space;
* ch 1; skip 1 ST; work pc into next st; [ch 1; skip 1 stitch;
work 1 dc into next 3 stitches, ch 1; skip 1 stitch; pc] x 2
ch 1; skip 1 stitch; work [2 dc; ch 2; 2 dc} into ch 2 corner space,
repeat from * 2 more times. CH 1; skip 1 stitch; work pc into next stitch;
[ch 1; skip 1 stitch; work 1 dc into next 3 stitches;
ch 1; skip 1 stitch; pc] x 2; join with a slip stitch into top of ch 3.
Fasten off color C attach color D in any chain 2 space
ROUND 6: CH 3, work [1 dc; ch 2; 2 dc] into same ch 2 space,
* work 1 dc into each dc and ch 1 space of previous round until corner ch 2 space;
work [2 dc, ch 2; 2 dc] into ch 2 space, repeat from * all around;
join with a slip stitch into top of ch 3. (20 dc on each side = 84 c; 4 x 2 ch spaces)
NOTE – DO NOT WORK INTO THE TOP OF THE PC
Fasten off color D attach color A in any chain 2 space
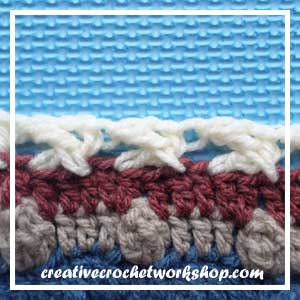
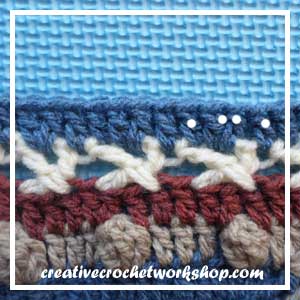
ROUND 7: CH 3, work [1 dc; ch 2; 2 dc] into same ch 2 space;
skip 3 sts; work 1 tr into 4th stitch; ch 2;
work 1 tr into the 1st stitch SKIPPED (CROSSOVER made) [skip 3 stitches;
work 1 tr into 4th stitch; ch 2; work 1 tr into the 1st stitch SKIPPED] x 4;
* work [2 dc; ch 2; 2 dc] into next 2 ch corner space;
[skip 3 stitches; work 1 tr into 4th stitch; ch 2;
work 1 tr into the 1st stitch SKIPPED] x 4,
repeat from * 2 more times; join with a slip stitch into top of ch 3.
Fasten off color A attach color B in any chain 2 space

ROUND 8: CH 3, work [1 dc; ch 2; 2 dc into same ch 2 space;
* [work 1 dc into next tr; 2 dc in ch 2 space; 1 dc into next tr] x 5;
work 1 dc into next 2 dc; work [2 dc, ch 2; 2 dc] into ch 2 space;
work 1 dc into next 2 dc. Repeat from * two more times.
Work 1 dc into next tr; 2 dc in ch 2 space; 1 dc into next tr] x 5;
work 1 dc into next 2 dc;
join with a slip stitch into top of ch 3. (28 DC on each side = 112 DC; 4 x 2 CH spaces)
Fasten off color B; attach color C in any chain 2 space
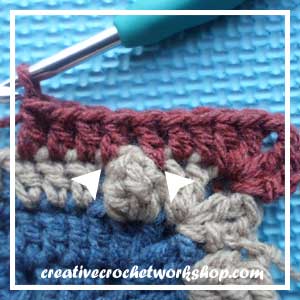
ROUND 9: CH 3, work [1 dc; ch 2; 2 dc] into same ch 2 space;
* ch 1; sk 1 stitch; work pc into next stitch;
[ch 1; skip 1 stitch; work 1 dc into next 2 stitches, ch 1; skip 1 stitch; pc] x 2.
CH 1; skip 1 stitch; work [2 dc; ch 2; 2 dc} into ch 2 corner space,
repeat from * 2 more times. CH 1;
skip 1 stitch; work pc into next stitch; [ch 1; skip 1 stitch;
work 1 dc into next 2 stitches; ch 1; skip 1 stitch; pc] x 2;
join with a slip stitch into top of ch 3. (6 x pc on each side = 24 pc; 14 DC on each side = 56 DC; 4 x 2 Ch spaces)
Fasten off color C; attach color D in any chain 2 space
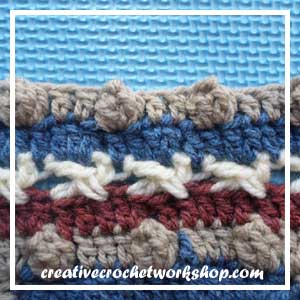
ROUND 10: NOTE – DO NOT WORK INTO THE TOP OF THE PC
CH 2, work [1 hdc; ch 2; 2 hdc] into same ch 2 space;
* work 1 hdc into each dc and ch 1 space of previous round until corner ch 2 space;
work [2 hdc, ch 2; 2 hdc] into 2 ch space,
repeat from * all around;
join with a slip stitch into top of ch 3.
(30 hdc on each side = 120 hdc; 4 x 2 CH spaces)
Fasten off color D; attach color A in any chain 2 space
ROUND 11: CH 1, work 1 sc; 1 hdc; 1 sc into ch 2 corner space;
* work 1 sc into each hdc until end of side;
work [1 sc; 1 hdc; 1 sc] into next ch 2 corner;
work 1 sc into each hdc, repeat from * 2 more times,
work 1 sc into each dc until end of side.
Fasten off and weave in ends.

Don’t forget to share your projects in my Facebook Group and/or on Instagram!
>>> SIGN UP FOR THE AMERICAN CROCHET NEWSLETTER! <<<
Happy Hookin!
XO, Mistie

I think thsi would be beautiful scaled up into one big queen sized afghan. I love the texture and “rustic” nature of this. Well done!
Hi TigerKim,
Thanks for visiting. I am in the process of making this square into a nice big blanket. It may take me sometime as I have a few other deadlines to take care of first.
Have a great weekend,
Mistie
Awesome! I will be watching for that. Good Luck will all your projects.