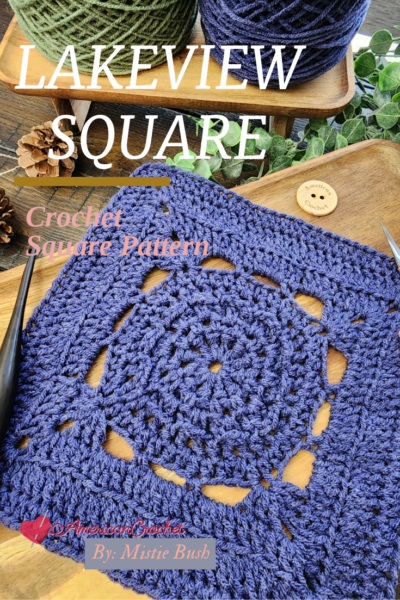
Welcome to the Lakeview Square, the second block in the Riverwood Square Crochet-Along! This square builds upon the foundation set by the Synott Square, introducing subtle textures through the use of back post stitches. Whether you’re following along with the CAL or simply looking for a beautiful textured square to add to your projects, this pattern is perfect for you!
This 9-inch square expands on the foundation set by the Synott Square, featuring back post stitches that add delicate texture and depth. Made with worsted weight yarn and a 5.5 mm hook, this pattern is ideal for beginner to intermediate crocheters looking to enhance their skills. Bring warmth and charm to your crochet projects with the cozy and inviting design of the Lakeview Square.
Sign up to receive exclusive pattern releases, step-by-step instructions, and helpful tips to guide you through this fun and engaging crochet-along! Click here to join!

I would love to see your projects in my Facebook Group and/or on Instagram!
Designed with versatility in mind, the Lakeview Square can be used in blankets, pillows, or even as a standalone design. The slight depth created by the stitchwork gives it a cozy and inviting feel, making it a wonderful addition to your crochet journey. Let’s gather our yarn and hooks and get started on this next exciting square!
Join the Crochet Along Community:
Don’t miss out—start your Riverwood Square CAL journey with us today!

As part of the Riverwood Throw CAL, this square is meant to complement the others in both texture and design. While the Synott Square focused on simplicity and structure, the Lakeview Square adds a touch of dimension, making it an excellent transition to upcoming blocks. This pattern is worked using basic stitches with slight variations to create a polished yet easy-to-follow design. Make sure to follow along with the tutorial for extra guidance, and don’t forget to share your progress in our Facebook Group or tag @AmericanCrochet on Instagram using #RiverwoodSquareCAL!
Here are a few more of my crochet alongs:
Buttercup Spice Crochet Blanket

Disclaimer: This post contains affiliate links. When you purchase something through these links I earn a small commission. You do not pay any extra for the item you purchase.
The Lakeview Square ~ Crochet Along
REQUIREMENTS
Before you begin, gather the following supplies:
Terminology
- US Terms
Level of Difficulty
- Beginner/Intermediate
Yarn
- #4 Worsted Weight
- I used Red Heart Super Saver in Denim
Hook and Notions
- Size Hook: I/9 (5.5 mm)
- Scissors
- Stitch markers (optional, for marking the beginning of rounds)
- Blunt needle
Measurement
- 9 inches
Gauge
- 17 dc = 4-inches on (Round 7) Using Red Heart Super Saver
Abbreviations
- Ch/chs = chain/chains
- Sc = single crochet
- Hdc = half double crochet
- Dc = double crochet
- Tr = treble crochet
- BLO = back loop only
- BPtr = back post treble
- Sl st = slip stitch
- Sp(s) = space(s)
Pattern Notes
- Ch 1 at the beginning of the round does not count unless otherwise stated.
- 1st Corner – work (3 dc, ch 2, 3 dc)
- 2nd Corner – work (2 dc, ch 2, 2 dc)
Tips for Crocheting the Lakeview Square:
- Stitch Tension: Be mindful of your tension to keep your square the right size. Adjust your hook if needed.
- Blocking: Once you’ve finished your square, block it to ensure it stays in perfect shape, especially for the larger project you’ll be working toward!

Get the Lakeview Square Pattern
🧶 You can follow the full tutorial for free on YouTube and crochet along with me step by step!
📄 Want the printable version? The ad-free PDF is available in my shop so you can take it on the go, highlight notes, or keep in your pattern binder.
- 🎥 Watch the Free Tutorial
- 🛒 Grab from the American Crochet Shop
- 🛒 Shop on Etsy
What’s Next?
📌 Finishing & Blocking
To achieve a professional finish, gently block your square:
✔ Pin to a blocking mat, shaping the edges evenly.
✔ Lightly mist with water or steam block for a polished look.
✔ Allow to dry completely before joining with other squares.
📌 Engage with Us!
We’d love to see how your Lakeview Square is coming along! Let us know in the comments:
💬 Do you prefer working with back loop stitches or back post stitches for adding texture? Drop your answer below!
📌 Join the CAL and share your progress:
✔ Instagram & TikTok: Tag @AmericanCrochet and use #RiverwoodSquareCAL
✔ Pinterest: Save and share your progress!
✔ Facebook Group: Connect with fellow crocheters!
Looking for previous squares? View all Riverwood Square CAL blocks here!
Get the Lakeview Square Pattern
🧶 You can follow the full tutorial for free on YouTube and crochet along with me step by step!
📄 Want the printable version? The ad-free PDF is available in my shop so you can take it on the go, highlight notes, or keep in your pattern binder.
- 🎥 Watch the Free Tutorial
- 🛒 Grab from the American Crochet Shop
- 🛒 Shop on Etsy
Looking Ahead
Congratulations on completing the Lakeview Square – the second square in our Crochet Along! Stay tuned for next week’s pattern, where we’ll be adding even more exciting designs to your crochet project. The fun has just begun, and we’re thrilled to crochet along with you every step of the way.
Sign up to receive exclusive pattern releases, step-by-step instructions, and helpful tips to guide you through this fun and engaging crochet-along! Click here to join!
Happy Hookin!
XO, Mistie