The Sable Button Scarf crochet pattern has a hint of texture and is easy to work up. With the cooler temps we have been experiencing lately I decided to whip up a new scarf. And I could not resist making it in Pumpkin Spice and Cocoa. It may not be Fall anymore but I still love those two colors together and will totally wear it year-round. I cannot help but think of a Pumpkin Spice Latte’, which just happens to be my favorite drink. Enjoy
Queue & Favorite on Ravelry OR Purchase it on ETSY!

There is just something about wearing one of my scarves that puts a smile on my face and makes me excited. It’s not like I get to wear my scarves much where I live so, when the opportunity arises you better believe I’m in my happy place.
I would love to see your projects in my Facebook Group and/or on Instagram!
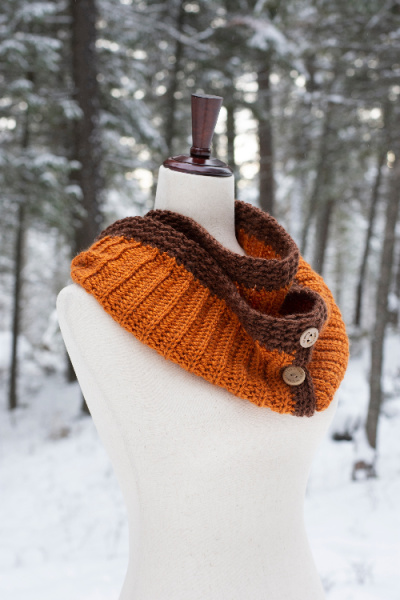
Sable Button Scarf is my first crochet scarf pattern of 2020. I love how soft, textured and cozy it is. I also love how it’s a 2-N-1 accessory! Wear it as a scarf or a cowl. Either way it’s a great addition to your Winter accessories. It’s combined with simple stitches and a new technique to create this upscale designer look that you will love crocheting for yourself, as well as your friends! Be sure to yell if you need help. I am here to guide you along the way.
You can find more of my crochet scarves over HERE

Disclaimer: This post contains affiliate links. When you purchase something through these links I earn a small commission. You do not pay any extra for the item you purchase.
SABLE BUTTON SCARF
REQUIREMENTS
Level of Difficulty
- Advanced Beginner
Yarn
- 560 yards, I used #4 Worsted Caron Simply Soft in Pumpkin and Chocolate (all yardages are based on 72” scarf)
Hook and Notions
- Size Hook: I (5.5mm) & J (6mm), scissors, stitch markers and blunt needle
3 – 1 inch buttons
Measurement
- 8 inches wide and 72 inches long
Gauge
Scarf: 16 hdc = 4 inches
Abbreviations
- Sc = single crochet
- Ch = chain
- Hdc = half double crochet
- BLO = back loop only
- St(s) = stitch(s)
Pattern Notes
- Weigh your yarn cake: ________ grams
- Worked from side to side
- 560 yards. I used #4 worsted weight Caron Simply Soft in Pumpkin and Chocolate (all yardages are based on 72” scarf)
- Because I am a tight crocheter I used the J crochet hook to chain with, so the chain isn’t too tight. This will also keep it from buckling. If you crochet loosely then you really shouldn’t have to go up a hook size when chaining. Rule of thumb always check your gauge.
- Chain 1 at beginning of row does not count
- This scarf is made in 8 inches width. Image is displaying a 8” scarf that is 72” long.
Ribbing: 16 hdc in 4″ of width
Special Stitches
- Back Loop Only (BLO) – Working in the back loop only of indicated stitch
Video Tutorials if available will be on my YouTube Channel – Subscribe to my YouTube Channel!
Queue & Favorite on Ravelry OR Purchase it on ETSY!
BUTTON SABLE SCARF INSTRUCTIONS
COLORS: A – Pumpkin; B – Chocolate
Working with Color A and J hook
Chain 25
Foundation Row using I hook: hdc in 2nd ch from the hook, hdc in each ch across. Turn (24 sts)
Row 1: Ch 1, BLO hdc in same st, BLO hdc in each hdc across. Turn (24 BLO hdc)
Repeat Row 1:
*You may only need 100 or so rows depending on how tall your stitches are. Because I am a tight crocheter I needed the 150-ish rows to equal 72 inches.
I recommend you write this number down so you have it for future reference. 😊
My gauge was roughly:
Each row should be 7” wide. 16 hdc’s in 4”
Each row will be approximately ½ inch in height.
Working in BLO
Fasten off yarn Color A and attach Color B. Ch 1, follow scarf pattern below
The Scarf
Working along long side of ribbing, going back along the edge of the ribbing you just worked.
Row 1: (To make it even I worked 3 hdc’s for every 2 rows of ribbing.) Starting with 2 hdc’s in the first row and ending with 1 hdc in the last row.
Row 2: Ch 1, hdc in same st, *sl st in the next st, hdc in next st,* repeat from * across, ending with a hdc. Turn (205 sts)
Row 3: Ch 1, sl st in the same st, *hdc in next st, sl st in next st,* repeat from * across, ending with a sl st. Turn (205 sts)
Repeat Rows 2 and 3:
3 times
My gauge was roughly: 13 hdc’s for every 4 inches (for Set up Row only)
COMPLETING
Now we are ready to set up for the buttonholes. If you do not wish to have buttons on your scarf then you may fasten off and weave in ends using your blunt yarn needle. If you would like to have the cute buttons on your scarf then do NOT fasten off yarn. Continue with Buttonholes Instructions below.
Buttonholes (Optional)
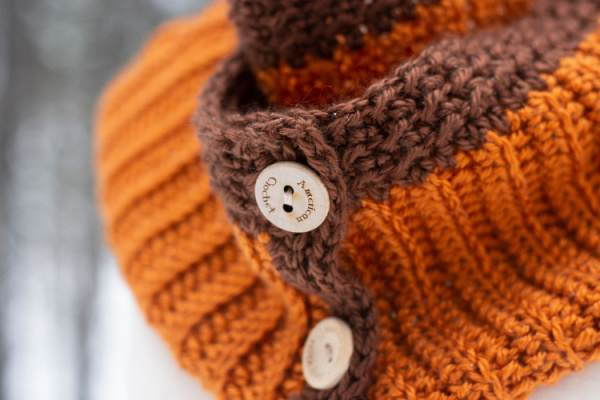
Row 1: Ch 1 and turn your work; hdc in same st, hdc in next st, sk next st, *hdc in next 10 sts, sk next st, ch 1,* repeat from * once, hdc in last 3 st. (25 hdc, 3 ch 1 sps)
Row2: Ch 1, hdc in same hdc, hdc in each hdc and ch 1 space across. (28 hdc)
ATTACHING BUTTONS
Working on opposite end of scarf (even end), attach buttons 1” from edge of scarf evenly across so they will attach to the holes accordingly.
Fasten off and weave in ends with blunt yarn needle.
Don’t forget to share your projects in my Facebook Group and/or on Instagram!
>>> SIGN UP FOR THE AMERICAN CROCHET NEWSLETTER! <<<
Happy Hookin!
XO, Mistie
![]()

