Every single crochet project begins with two things: a slip knot and a chain. Master these two and you have unlocked the door to everything else in crochet.
The slip knot is how we attach the yarn to the hook, and the chain (or foundation chain) is the very first row that everything else is built on. Do not worry — they are easier than they look, and you will have them down in minutes.
Back to Crochet Techniques & Stitch Library
Before You Begin
- This tutorial uses US crochet terminology
- A slip knot and chain are the foundation of nearly every crochet pattern
- Keep your chains loose and even — tight chains are the #1 beginner struggle
- Do not count the loop on your hook or the slip knot as a chain
- This post contains affiliate links — see the disclaimer at the top of this page
What You’ll Need
Hook and Notions
Yarn
- Any weight — worsted weight (#4) shown in tutorial for clarity
Abbreviations (US Terms)
- Ch /chs = chain /chains
- YO = yarn over
- Sl knot = slip knot
Skill Level
Absolute Beginner
Gauge
Not important for this tutorial
Stitch Multiple
Chain any number of stitches you like
Foundation Chain
This IS your foundation!
Frequently Asked Questions
Does the slip knot count as a stitch?
No — the slip knot and the loop on your hook are never counted as chains or stitches. Start counting from the first chain you make after the slip knot.
My chains are so tight I can barely work into them. Help!
This is the most common beginner struggle! Try chaining a little looser, or go up a hook size just for your foundation chain. It gets easier with practice.
How many chains should I make?
However many your pattern calls for! For practice, chain 20 or so. Remember not to count the loop on your hook.
What is the difference between a chain and a foundation chain?
They are the same stitch — a “foundation chain” just means the row of chains you make at the very start of a project to build your first row on.
Slip Knot and Chain Stitch Instructions
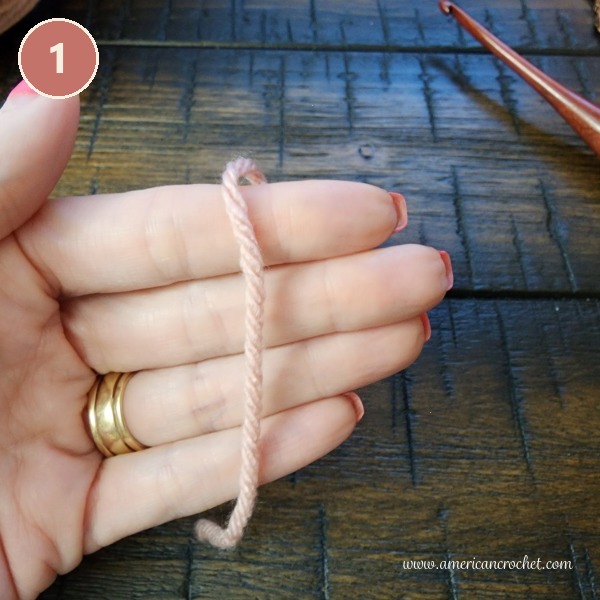
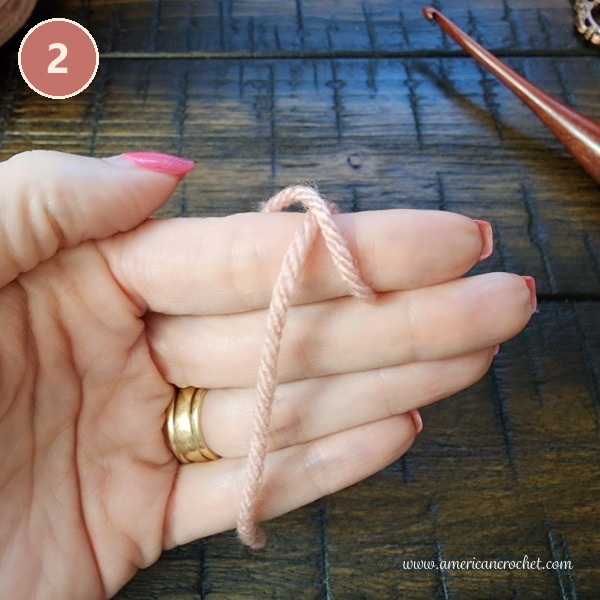
To make a slip knot:
- Drape the yarn over your fingers, leaving a tail hanging down
- Cross the working yarn (the strand attached to the ball) behind the tail to form a loop
- Reach your hook through the loop, grab the working yarn, and pull it through
- Place the new loop on your hook and gently tighten it up — not too tight! It should slide easily along the hook
Here is what that looks like — follow along with the photos:
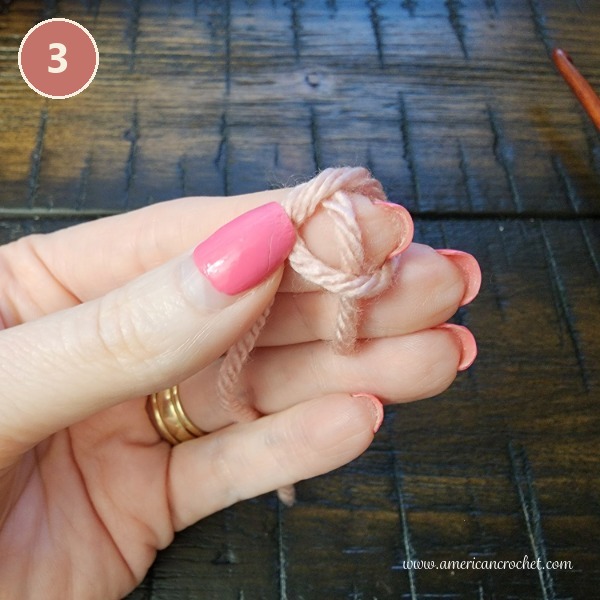
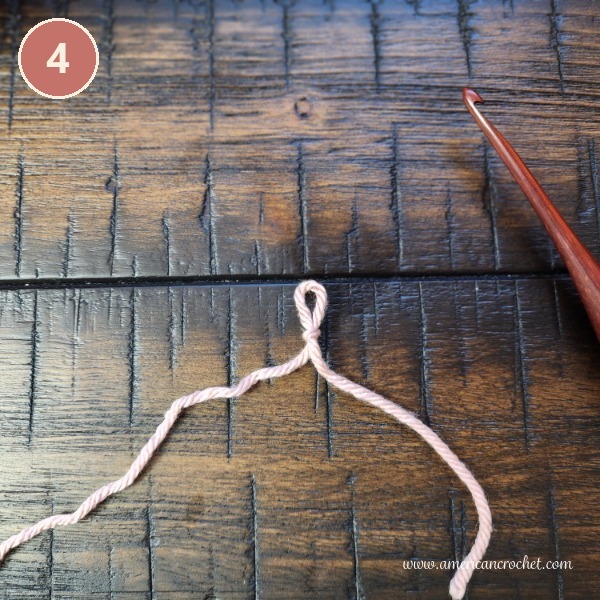
To make a chain (ch):
- With the slip knot on your hook, yarn over (wrap the yarn over your hook from back to front)
- Pull the yarn through the loop already on your hook
- That is one chain! Repeat for as many chains as you need
Practice: Make a slip knot, then chain 20. Notice how each chain looks like a little “V” or braid on the front, with a bump on the back. Count your chains — remember, the loop on your hook does not count!
You did it! You learned the Slip Knot and Chain Stitch!
You just made your very first crochet stitches — the slip knot and chain! This is the foundation for everything you will ever crochet. Practice a few rows of chains until they feel even and relaxed, and you are ready for your next stitch.
What You’ll Love About the Slip Knot and Chain Stitch
- It is the very first skill in crochet — everything builds from here
- Quick to learn and satisfying to practice
- Once it is in your hands, it becomes automatic
- Loose, even chains make every future project so much easier
Video Tutorial
Prefer to watch? Follow along with me in the step-by-step video tutorial below.
▶ Watch this tutorial on YouTube
Let’s stay connected. Sign up to receive new patterns, maker inspiration, and a little hope delivered straight to your inbox.

Common Beginner Mistakes
- Making the slip knot too tight — it should slide freely on the hook
- Chaining too tightly — loose, even chains are much easier to work into
- Counting the loop on the hook as a chain — it is never counted
- Twisting the chain — keep the little “V”s facing you and the bumps in back
Practice Before Moving On
- Make several rows of chains until they feel even
- Practice counting your chains accurately
- Keep an even, relaxed tension from start to finish
Ready for Your Next Stitch?
Now that you can make a slip knot and chain, here is your very next step:
- How to Single Crochet — the first real stitch every beginner learns
Engage With Us!
We would love to see how the slip knot and chain stitch is working up for you! Share your progress:
- Instagram & Facebook: Tag @AmericanCrochet and use #ACMakers
- Pinterest: Save this tutorial so you can always find it again!
Looking Ahead
You have the foundation — now let us build on it! Head to How to Single Crochet to learn your first stitch.
Helpful Resources
- Join our Facebook Crochet Community — pattern support, inspiration, and a warm community of makers
- Subscribe on YouTube — video tutorials and behind the scenes content
- Sign up for our newsletter — new patterns and exclusive updates delivered to your inbox
Keep Learning
Ready to explore more techniques? Head back to the library: → Crochet Techniques & Stitch Library
Or start from the beginning with Crochet Fundamentals: → Crochet Fundamentals